發表文章

目前顯示的是 3月, 2019的文章

Visualize model in keras (ubuntu)

圖片
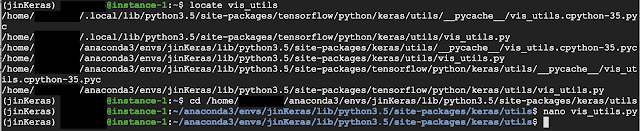
Step1. 安裝相關套件 #安裝相關套件 sudo apt-get install graphviz conda install graphviz conda install pydotplus pip install pydot  Step2. 修改vis_utils.py檔 利用指令locate找到vis_utils.py檔 sudo updatedb locate vis_utils (此時找到的路徑可能不只一個)選擇路徑(site-packages/keras/utils)中的vis_utils檔,並修改檔內的函式model_to_dot() cd /home/yourID/anaconda3/envs/jinKeras/lib/python3.5/site-packages/keras/utils nano vis_utils.py 將其中的layers = model.layers改為layers = model._layers: Step3. 於程式碼中繪出model #import from keras.utils.vis_utils import model_to_dot # build/load model here #write out model figure in png if_show_shapes=True if_show_layer_names=True plot_model(model,show_shapes =if_show_shapes, show_layer_names =if_show_layer_names , to_file='modelFigure.png') Note. 若無修改vis_utils的步驟則輸出的模型圖在input layer的地方將會有亂碼產生

How to predict on test data set using keras with a trained model

圖片
Step1. import 相關套件 #讀取模型與餵圖 from keras.preprocessing.image import ImageDataGenerator from keras.models import load_model #confusion_matrix from sklearn.metrics import classification_report, confusion_matrix #繪製模型 from keras.utils import plot_model from IPython.display import SVG from keras.utils.vis_utils import model_to_dot #其他相關套件 import numpy as np Step2. 設定如何取test set圖片 #test樣本共有40張,其寬高是175,89 nb_test_samples=40 img_width, img_height = 175, 89 batch_size_test=nb_test_samples#test時一次直接拉40張進來測試,故batch_size數直接等於樣本數 #利用ImageDataGenerator將test樣本讀進來 test_datagen = ImageDataGenerator(rescale=1. / 255) test_data_dir = './725kerasFormat/test' test_generator = test_datagen.flow_from_directory( test_data_dir, target_size=(img_height, img_width),#所讀圖片高寬將強制resize為(img_height, img_width) batch_size=batch_size_test, class_mode='categorical', shuffle=False)#test時不能shuffle樣本 這邊可以暫時看看讀入的圖怎麼被label: tgClass=test_generator.classes p

Transfer Learning based on inceptionV3 using Keras, step by step

圖片
Step1. import 相關套件 #import建構模型所需使用的函式與套件 import keras from keras import backend as K from keras.models import Sequential from keras.layers import Activation,GlobalAveragePooling2D,Dropout,InputLayer from keras.layers.core import Dense, Flatten from keras.optimizers import Adam from keras.metrics import categorical_crossentropy from keras.preprocessing.image import ImageDataGenerator from keras.layers.normalization import BatchNormalization from keras.layers.convolutional import * from sklearn.metrics import confusion_matrix from keras.models import load_model #import callbacks(用來監看訓練過程中所產生的數據) from keras import callbacks from keras.callbacks import EarlyStopping from keras.callbacks import ModelCheckpoint from keras.callbacks import TensorBoard from keras.callbacks import CSVLogger #其他相關套件 import os import numpy as np Step2. 依格式擺放訓練/驗證資料 用以擺放訓練圖片的路徑(./725kerasFormat/train),其下要擺放欲訓練類別的資料夾(clear與dirty),其下再擺放圖片: if __name__=='__main__':     train_path = './725ker

如何在GCP中架設keras環境(Ubuntu16.04、anaconda為例)與相關問題:

圖片
Step1. 架設Google cloud platform(GCP)環境,主要依據在medium上面的文章(系統選Ubuntu 16.04 LTS): Complete Step by Step Guide of Keras Transfer Learning with GPU on Google Cloud Platform ⌦執得注意的是,實作後發現在該文章中的Step4(執行bash Anaconda3-4.0.0-Linux-x86_64.sh)之前要先安裝bzip2: sudo apt-get install bzip2 否則將有如下錯誤: tar (child): bzip2: Cannot exec: No such file or directory 訊息,導致安裝不完全。若已經先執行bash Anaconda3-4.0.0-Linux-x86_64.sh了,則不妨利用rm指令刪除剛才不完整安裝的anaconda3: rm -rf ~/anaconda3 接著再依次安裝bzip2與anaconda3。 ⌦安裝anaconda3的過程會出現: Do you wish the installer to prepend the Anaconda install location to PATH in your /root/.bashrc ? [yes|no] 表示Anaconda安裝的路徑要不要加入bashrc中? 答要,則anaconda3這個路徑裡面的bin資料夾路徑就會被加入bashrc中(否則你必須手動export,將路徑設定至PATH內)。這個bin路徑含有conda指令的執行檔,創建虛擬環境時必須要用到這個指令,故必須回答yes或手動export,相關討論 在此 。下為回答yes後查看.bashrc的結果: nano ~/.bashrc 可以發現在~/.bashrc中,最後面已經被加入了bin資料夾的位置。或利用指令查詢: echo $PATH 或: which conda ⌦使用到的指令說明: wget: a non-interactive network retriever (下載檔案用) bash: 執行某個sh腳本,例如bash Anaconda3-4.0.0-Linux-x86

How to keep jupyter notebook training on GCP without opening computer all the time

圖片
(關於tmux的介紹網路上有相當多的資源故不贅述,直接開始本編主題) 在google cloud platform上利用jupyter notebook訓練模型時,總必須保持本地端電腦開啟且ssh連線不能中斷,利用tmux則能在本地端電腦關閉的情況下讓您繼續在GCP上跑訓練,方法如下(本篇GCP上的作業系統為ubuntu 16.04): Step1. 連上GCP,安裝 tmux,官網文件 在此 ,可知安裝指令: conda install -c conda-forge tmux Step2. 安裝完成後直接鍵入tmux產生一個session: 創建後來到下面有條綠線的視窗,此時即可直接切換至您的conda環境,並啟動 jupyter notebook(綠線第一個數字表示目前屬於第幾個session(或說index)、第二個數字表示目前屬於該session中的第幾個window): 接著流程便與一般使用jupyter notebook一樣,可以在上面修改程式碼、跑訓練等等,但至此,您已可以直接關閉ssh連線,或直接關閉本地端電腦,而jupyter notebook上的訓練不會中斷: 這是因為tmux server仍持續運作的原因(此時直接連上GCP,鍵入tmux ls,也可以發現用於訓練的session仍存在)。 補充說明: 承上文,再次開啟ssh連線,若欲連回剛才的session則可以使用 tmux attach指令(下面介紹)。此時也可以再tmux一次,產生新的session做其他事情: 欲退出目前這個session(即detached)可以先按ctrl+b,放開後再按d即可,退出後會顯示[detached (from session ...)];若要重新連回第0個session則鍵入如下(連回第1個session則下述0改為1): tmux attach -t 0 若要直接刪除第0個session則鍵入(刪除第1個session則下述指令0改為1): tmux kill-session -t 0